Willy Robotics Academy presents:
BUTTONS!
What do all these things have in common?
What is a push button?
A button is just a switch. When you push it, it's like closing a door to let electricity flow!
Your First Button & LED!
Let's start with a simple project: turning on one LED with one button. This is a great way to learn the basics!
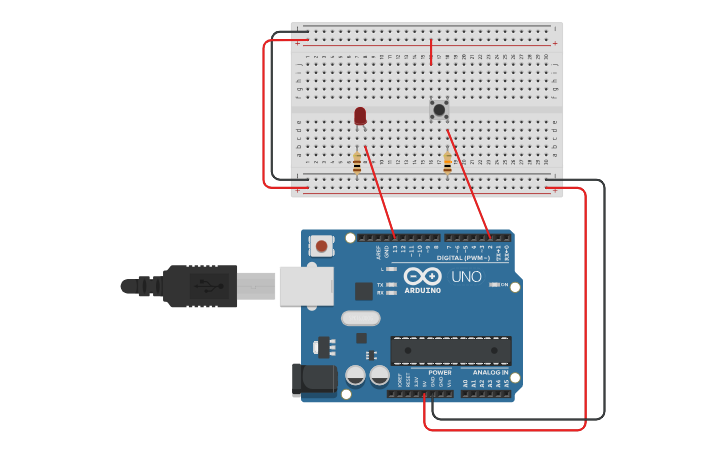
Build the Circuit:
Here's how to connect your Arduino for a simple button and LED project. You'll need one push button, one LED, one 220 Ohm resistor, and one 10k Ohm resistor.
Code Your First Button!
This code reads the button and turns the LED on or off. Hover over the lines to learn what they mean!
int buttonPin = 2;   // We tell the Arduino which pin our button is connected to.
  This line gives a name to the Arduino pin connected to our button.

int ledPin = 13;     // And which pin our LED is connected to (the built-in one).
  This line gives a name to the Arduino pin connected to our LED.


void setup() {
  The 'setup' part runs only once when the Arduino first turns on.

  pinMode(buttonPin, INPUT); // We tell the Arduino that the button pin will be an INPUT (it's getting information).
  We tell Arduino that the button pin will receive signals (INPUT).

  pinMode(ledPin, OUTPUT);   // And the LED pin will be an OUTPUT (it's sending information to turn on/off).
  We tell Arduino that the LED pin will send signals (OUTPUT).

}


void loop() {
  The 'loop' part runs over and over again, super fast!

  int buttonState = digitalRead(buttonPin); // The Arduino checks if the button is pressed or not.
  This reads the button's state: HIGH (pressed) or LOW (not pressed).

  if (buttonState == HIGH) { // If the button is pressed (HIGH is 1)
  If the button is pressed, do this...

    digitalWrite(ledPin, HIGH); // Turn the LED ON!
  ...turn the LED ON!

  } else {
  Otherwise (if the button is not pressed)...

    digitalWrite(ledPin, LOW);  // Turn the LED OFF!
  ...turn the LED OFF!

  }

  delay(10); // A small pause to make sure everything works smoothly
  A tiny pause to keep things smooth.

}
Try it now!
Click the button to turn the LED on and off!
Let's Build Traffic Lights!
Follow these steps to connect your Arduino for a traffic light!
Coding Our Traffic Lights!
This code uses buttons to control our traffic lights. Hover over the lines to learn what they mean!
int redLedPin = 9;   // Pin for Red LED
  This tells the Arduino which pin is connected to the Red LED.

int yellowLedPin = 10; // Pin for Yellow LED
  This tells the Arduino which pin is connected to the Yellow LED.

int greenLedPin = 11; // Pin for Green LED
  This tells the Arduino which pin is connected to the Green LED.


int redButtonPin = 2; // Pin for Red button
  We pick pin 2 for our Red light button.

int yellowButtonPin = 3; // Pin for Yellow button
  We pick pin 3 for our Yellow light button.

int greenButtonPin = 4; // Pin for Green button
  We pick pin 4 for our Green light button.


void setup() {
  The 'setup' part runs only once when the Arduino first turns on.

  pinMode(redLedPin, OUTPUT);
  We tell Arduino to send power OUT to the Red LED.

  pinMode(yellowLedPin, OUTPUT);
  We tell Arduino to send power OUT to the Yellow LED.

  pinMode(greenLedPin, OUTPUT);
  We tell Arduino to send power OUT to the Green LED.


  pinMode(redButtonPin, INPUT); // Button pins are INPUTS
  We set the Red button's pin to be an INPUT, because it sends information IN to Arduino.

  pinMode(yellowButtonPin, INPUT);
  We set the Yellow button's pin to be an INPUT.

  pinMode(greenButtonPin, INPUT);
  We set the Green button's pin to be an INPUT.

}


void loop() {
  The 'loop' part runs over and over again, checking buttons and changing lights!

  int redButtonState = digitalRead(redButtonPin);
  Read if the Red button is pressed.

  int yellowButtonState = digitalRead(yellowButtonPin);
  Read if the Yellow button is pressed.

  int greenButtonState = digitalRead(greenButtonPin);
  Read if the Green button is pressed.


  if (redButtonState == HIGH) {
  If the Red button IS pressed...

    digitalWrite(redLedPin, HIGH); // Turn Red ON
  ...turn the Red LED ON.

    digitalWrite(yellowLedPin, LOW); // Turn others OFF

    digitalWrite(greenLedPin, LOW);

  } else if (yellowButtonState == HIGH) {
  Else if the Yellow button IS pressed...

    digitalWrite(redLedPin, LOW);

    digitalWrite(yellowLedPin, HIGH); // Turn Yellow ON
  ...turn the Yellow LED ON.

    digitalWrite(greenLedPin, LOW);

  } else if (greenButtonState == HIGH) {
  Else if the Green button IS pressed...

    digitalWrite(redLedPin, LOW);

    digitalWrite(yellowLedPin, LOW);

    digitalWrite(greenLedPin, HIGH); // Turn Green ON
  ...turn the Green LED ON.

  } else {
  If no button is pressed, all lights turn OFF.

    digitalWrite(redLedPin, LOW);

    digitalWrite(yellowLedPin, LOW);

    digitalWrite(greenLedPin, LOW);

  }

  delay(10); // Short delay to prevent rapid changes
  A tiny pause to make sure everything works smoothly.

}
Try The Traffic Lights!
Click the buttons below to control the traffic lights manually!